
Learning how to remove wallpaper the right way saves you hours of frustration and protects your walls from damage. Whether you live in a historic New Smyrna Beach bungalow or a modern Edgewater home, outdated wallpaper drags down your entire room's appearance. Our team at JPL Painting helps Volusia County homeowners revitalize their spaces every day. We remove wallpaper, repair walls, and apply flawless fresh paint that transforms any room.
Florida's coastal humidity adds a unique twist to wallpaper removal. Moisture softens adhesive faster here, but it also means mold can hide behind older wallpaper layers. You need the right removal methods, the correct tools, and patience to get paint-ready walls. This guide walks you through every step so you can tackle the job with confidence. Clean. Precise. On Time. - that is how we approach every project.
Ready to strip that old paper and transform your walls? Call (386) 576-4730 for a free estimate from your trusted local painting team.
Why Florida Homes Face Unique Wallpaper Challenges
Florida's climate plays a bigger role in wallpaper removal than most homeowners realize. High humidity softens wallpaper glue over the years, which can make stripping easier in some cases. That same moisture, however, creates concerns beneath the surface.
Coastal homes in New Smyrna Beach and Flagler Beach often deal with trapped condensation behind walls. Older wallpaper can mask mold growth, water stains, or even drywall damage from seasonal storms. Before you start removing wallpaper, inspect the area for soft spots, discoloration, or musty odors. Our team frequently discovers hidden concerns during wallpaper removal projects across Volusia County. We address those issues before they turn into expensive repairs.
Understanding your home's climate history helps you pick the right removal methods and avoid surprises.
Tools and Supplies You Need Before You Start
Gathering your supplies first keeps the project moving smoothly. You do not want to stop mid-strip to hunt for a tool. Here is what our team recommends:
- Wallpaper scraper - a 3-inch or 6-inch broad knife for lifting paper
- Scoring tool - creates tiny holes so solution penetrates the adhesive
- Spray bottle or pump sprayer for applying your removal solution
- Drop cloths to protect your floors from water and glue residue
- Sponge and bucket for wiping down walls after stripping
- Putty knife for scraping stubborn adhesive patches
- Steamer (optional) for tough, multi-layer wallpaper
- Warm water + dish soap - a gentle solution that loosens most adhesive
- Wallpaper remover concentrate for stubborn, older wallpaper
Buy a high-quality scraper with a comfortable grip. Low-end scrapers flex too much and gouge drywall. Our crew uses rigid stainless steel blades that hold their edge through long jobs.
Prepare Your Room for Wallpaper Stripping
Prep work separates a clean job from a messy one. Move furniture to the center of the room and cover it with plastic sheeting. Lay drop cloths over your flooring, overlapping the edges by at least six inches. Wallpaper paste and warm water will drip constantly, so secure your drop cloths with painter's tape along the baseboards.
Remove outlet covers, switch plates, and any wall-mounted fixtures before you start. Tape over the outlets themselves to keep water out of your electrical boxes. This step takes ten minutes and prevents serious safety concerns.
Turn off power in the work area. Water and electricity do not mix. Shut off the breaker for the room you are working in before spraying any solution near outlets or switches. Our team treats this as a non-negotiable safety step on every project.
If you are unsure which breaker controls the room, test the outlets with a lamp before you begin. Florida homes, especially older ones in DeLand and St. Augustine, sometimes have confusing or outdated electrical panels. Take the extra minute to verify.
Step-by-Step: Strip Wallpaper Like a Pro
Step 1: Score the Wallpaper Surface
Start at the bottom seam of the wallpaper, where it meets the baseboard. Run your scoring tool in circular motions across the entire wall. The scoring tool creates tiny holes that let your stripping solution reach the adhesive underneath.
Do not press so hard that you gouge the drywall. Light, consistent pressure creates enough holes for the solution to penetrate. Our team scores a full wall before moving to the next step. This approach keeps the workflow efficient.
Step 2: Apply Your Removal Solution
Fill your spray bottle with warm water and dish soap - about a teaspoon of soap per quart of water. Spray the scored wallpaper until it feels saturated but not dripping. Let the solution sit for 10 to 15 minutes so it can break down the glue.
Work in sections about three feet wide. If you spray the entire room at once, the solution dries before you reach the far wall. The wallpaper should feel soft and slightly bubbly when it is ready to peel.
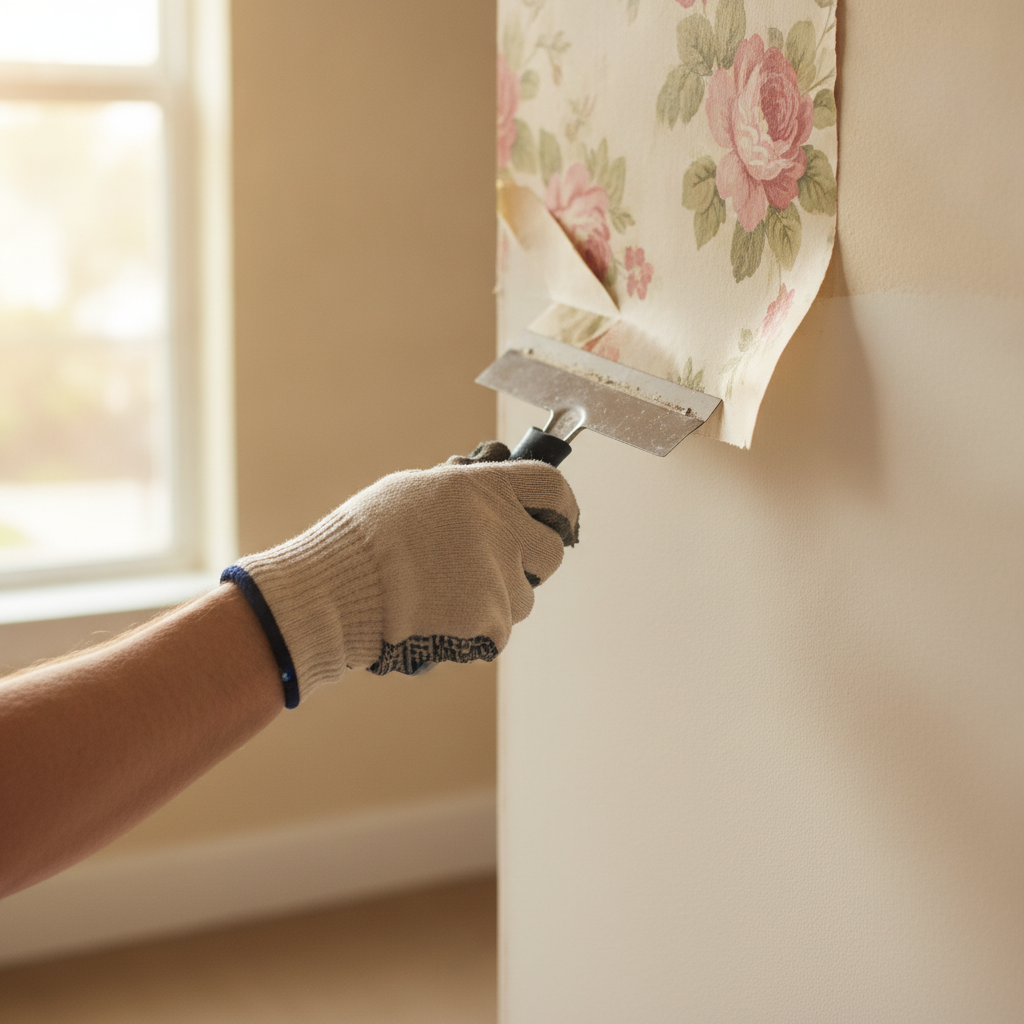
Step 3: Peel From the Bottom Up
Slide your scraper under the bottom seam and lift gently. Grab the loose edge and pull upward at a 45-degree angle. The top layer of wallpaper should peel away in long strips if you saturated it properly.
If the paper tears, spray more solution and wait another five minutes. Forcing dry wallpaper off will damage your drywall surface. Our crew learned this lesson early - patience prevents patching later.
Step 4: Remove the Backing and Adhesive
Many wallpapers have a vinyl top layer and a paper backing underneath. After you remove the top layer, spray the backing again and let it soak. Scrape the backing off in steady, controlled strokes.
Once the paper is gone, you will likely see adhesive residue on the walls. Spray the wall with your solution and wipe it down with a sponge. Change your water frequently - dirty water just smears the glue around. This step determines whether your walls end up paint-ready or rough and uneven.
Wallpaper Giving You Trouble? We Can Help
Skip the mess and let our team handle your wallpaper removal project from start to finish.
(386) 576-4730When to Use a Wallpaper Steamer
Some wallpaper laughs at warm water and soap. Older homes in Palm Coast and Deltona often have multiple layers of paper, or wallpaper installed with heavy-duty adhesive. A wallpaper steamer provides the extra heat and moisture needed to break through tough glue.
Steamers work by releasing hot steam through a flat plate pressed against the wall. The steam penetrates the scoring holes and softens the adhesive from the inside out. Hold the steamer plate on one spot for 15 to 30 seconds, then scrape immediately while the glue is still soft.
Our team uses steamers for:
- Multi-layer wallpaper - three or four layers stacked on top of each other
- Old paste adhesive - heavy, hardened glue from decades ago
- Painted-over wallpaper - someone painted over the paper, trapping it
- Vinyl-coated paper - the vinyl layer blocks liquid solutions
Steam takes longer than spraying, but it handles the toughest removal challenges. Wear heavy gloves and long sleeves - steam reaches 200 degrees or higher. Keep the steamer moving so you do not damage drywall or crack old plaster. Work from top to bottom with a steamer so water runs down onto paper you have not steamed yet.
DIY Removal Solutions You Can Mix at Home
Warm Water and Dish Soap
This is the workhorse solution for most wallpaper. Warm water and dish soap breaks down standard wallpaper adhesive without harsh chemicals. Use warm, not hot, water - hot water can soften drywall joint compound and create surface damage. Apply generously and give it time to work.
Vinegar and Water
White vinegar mixed with warm water (one cup per gallon) works well on older adhesive. The acidity helps dissolve glue bonds. Vinegar smells strong, but the odor fades as the walls dry. Open windows and run a fan to speed up drying and ventilation.
Fabric Softener and Water
Fabric softener mixed with warm water is another popular DIY solution. The softening agents break down adhesive while leaving a smooth residue that scrapes off easily. Use one capful of fabric softener per gallon of warm water. Some homeowners prefer this method because it leaves less chemical smell behind.
Commercial Wallpaper Remover
When home solutions fall short, a commercial wallpaper remover concentrate does the job. These products contain enzymes specifically formulated to dissolve wallpaper adhesive. Follow the manufacturer's dilution instructions carefully. Our team keeps a commercial concentrate on hand for the toughest projects in Volusia County.
Common Mistakes to Avoid During Wallpaper Removal
Even careful DIYers make mistakes that damage walls and waste time. Avoid these pitfalls our team sees regularly:
- Rushing the process - let solutions soak long enough to do their job
- Gouging drywall with the scraper - use light, angled pressure
- Skipping the scoring step - solution cannot penetrate unperforated vinyl
- Spraying too much at once - work in sections so solution stays wet
- Ignoring electrical safety - always shut off power before spraying near outlets
- Not cleaning adhesive residue - leftover glue ruins new paint adhesion
Each of these mistakes turns a manageable project into a larger concern. Take your time, follow the steps, and your walls will come out clean and smooth.
What to Do After You Remove Wallpaper
Inspect and repair your walls. Once the wallpaper and adhesive are gone, inspect every wall carefully. Look for gouges, soft spots, water stains, or mold growth. Florida humidity means moisture damage is common behind older wallpaper, especially in homes near the coast.
Small gouges and scratches need drywall repair before painting. Apply joint compound to the damaged areas, sand smooth, and prime. Our team handles drywall repair as part of the full wallpaper removal process so your walls end up seamless and paint-ready.
Larger concerns like water damage or mold require professional attention. Do not paint over mold - it will grow through the new paint and create health concerns for your family.
Prime the walls before painting. Bare drywall and patched areas need a quality primer. Primer seals the surface and gives your new paint a consistent base to adhere to. This step matters especially after wallpaper removal because residual adhesive can interfere with paint adhesion.
Use an oil-based or shellac-based primer for the best results over formerly wallpapered walls. These primers seal in any remaining glue residue and prevent it from bleeding through your new paint. Our team applies premium primer on every post-wallpaper painting project.
Choose your new paint color. Removing old wallpaper opens the door to a fresh look. Now is the perfect time to schedule a color consultation and pick a shade that revitalizes your space. Florida homes look stunning with light, airy colors that reflect the coastal environment. Soft blues, warm whites, and sandy neutrals complement the New Smyrna Beach aesthetic beautifully.
Once you pick your color, check out our painting tips for advice on getting a flawless finish. You can also read about how long paint takes to dry so you can plan your project timeline.
When to Call a Professional Instead of DIY
DIY wallpaper removal works well for single rooms with standard wallpaper. Larger projects, stubborn adhesive, or homes with hidden damage call for professional help. Here are signs you should call our team:
- Multiple rooms - the job grows fast when you have a whole house to strip
- Multiple wallpaper layers - each layer adds time and effort
- Drywall damage visible - repairs need a skilled hand for seamless results
- Mold or water stains - health concerns require proper remediation
- Tight timeline - our crew finishes in days what takes weeks DIY
Our team serves homeowners across New Smyrna Beach, Edgewater, DeLand, Deltona, Ponce Inlet, Palm Coast, St. Augustine, and Flagler Beach. We hold licenses and insurance, and we carry a 4.6 out of 5 star rating across 174 reviews. Your home deserves expert care from a team that treats it like their own.
Call (386) 576-4730 today for a free estimate on professional wallpaper removal and painting services.
Why JPL Painting Is Volusia County's Trusted Choice
Homeowners choose JPL Painting because we deliver on our promises. Clean. Precise. On Time. - that tagline drives every project we take on. Our owner, Julian, personally oversees each job to ensure meticulous craftsmanship and honest communication.
We understand Florida's coastal climate and how it affects your walls. Our team uses Florida-tough materials and humidity-resistant products that hold up against our unique weather. From wallpaper removal to interior painting, we handle the full process so you deal with one trusted local company instead of coordinating multiple vendors.
Every project includes:
- Free estimates with transparent pricing and no hidden fees
- Daily cleanup - we protect your furniture and leave your home spotless
- Paint-ready surfaces - full prep work before any paint goes on the walls
- Expert crew - skilled painters who take pride in every detail
- Local knowledge - we know Volusia County homes inside and out
We have built our reputation one home at a time. When you hire JPL Painting, you hire a team that cares about your home as much as you do.


